
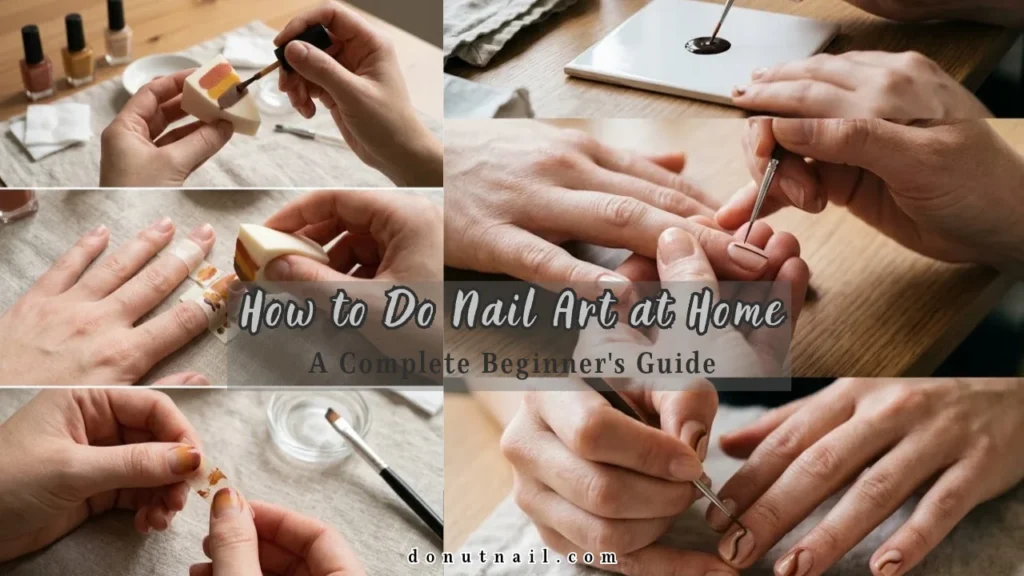
Learn how to do nail art at home with this beginner’s guide. Discover essential tools, step-by-step techniques, nail prep tips, and pro troubleshooting.
Scrolling through social media, it is easy to feel that modern nail art requires an art school degree, a professional salon license, and hundreds of dollars in high-tech equipment. Between hypnotic videos of hand-painted portraits, complex builder-gel extensions, and mesmerizing 3D sculpting, DIY nail art can seem intimidating before you even unscrew a bottle of polish.
The truth is much simpler: stunning, professional-looking nail art does not require complex freehand painting or years of formal training. Some of the most chic, popular manicures seen on runways and Pinterest boards rely on basic geometric shapes, clever negative space, understated dots, and clean lines. When you understand the underlying mechanics of nail prep, brush control, and product layering, you can create gorgeous manicures at your kitchen table for a tiny fraction of salon prices.
Doing your own nails is also deeply rewarding. It serves as a creative, mindful ritual, gives you complete control over the health of your natural nails, and lets you switch up your aesthetic whenever inspiration strikes.
If you have ever felt discouraged by smudges, shaky lines, or polish that chipped twenty-four hours after painting, this comprehensive beginner’s guide will demystify the entire process. From gathering your starter kit to mastering five foolproof techniques and learning how to paint your non-dominant hand without frustration, here is everything you need to know about how to do nail art at home.
The Beginner DIY Nail Art Toolkit: What You Need (and What You Can Skip)
When starting out, it is tempting to order a massive fifty-piece nail kit online. However, bloated kits often come with low-quality brushes that shed bristles, clumpy glitters, and tools you will likely never touch. A focused, high-quality starter kit makes learning far easier and keeps your workspace organized.
Core Tools Worth Investing In
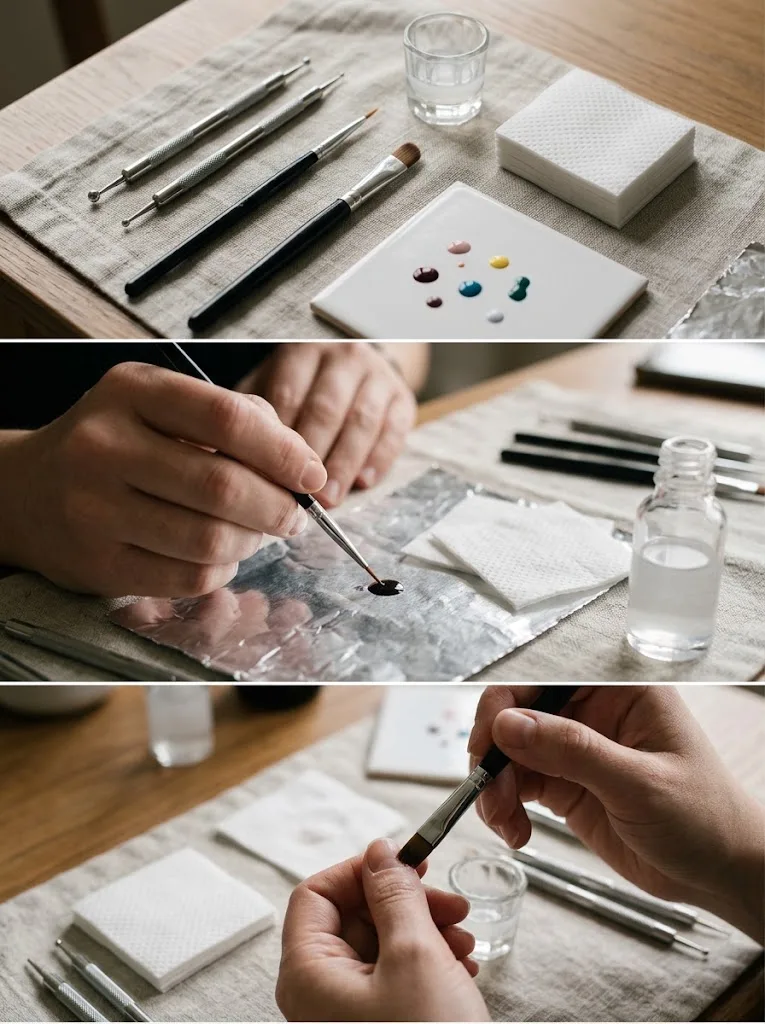
- Dual-Ended Dotting Tools: These small metal styluses feature different-sized spherical balls at each end (typically ranging from 0.8mm to 2.5mm). They are the single most versatile tool for beginners, allowing you to create perfect polka dots, daisy petals, hearts, and retro patterns without needing any freehand brush control.
- Ultra-Fine Striping Brush (7mm to 9mm): A dedicated nail art brush with long, flexible synthetic bristles. The length of the bristles acts as an organic stabilizer, gliding smoothly over the curved nail plate to produce razor-sharp pinstripes, French tips, and clean borders.
- Dense, Angled Cleanup Brush: Precision nail art is not defined by never making mistakes; it is defined by knowing how to erase them. A small, firm synthetic makeup brush or angled nail cleanup brush dipped in acetone instantly cleans up wobbly lines and flooded cuticles.
- Pure Acetone: Standard non-acetone polish removers contain water and conditioning oils that leave an oily film, making crisp cleanup difficult. Pure acetone dissolves stray lacquer immediately on contact.
- Lint-Free Nail Wipes: Traditional cotton balls and pads leave tiny microscopic fibers behind on the nail plate, which can ruin wet polish. Lint-free wipes keep your canvas clean.
- A Non-Porous Palette: A ceramic tile, glass coaster, or piece of aluminum foil serves as your mixing and dispensing station. Never dip detail brushes directly into a polish bottle; dispense a small drop onto your palette first to control product volume.
Household Items You Can Use for Free
You do not need to spend money on specialized nail gear right away. Many everyday household items double as effective nail art tools:
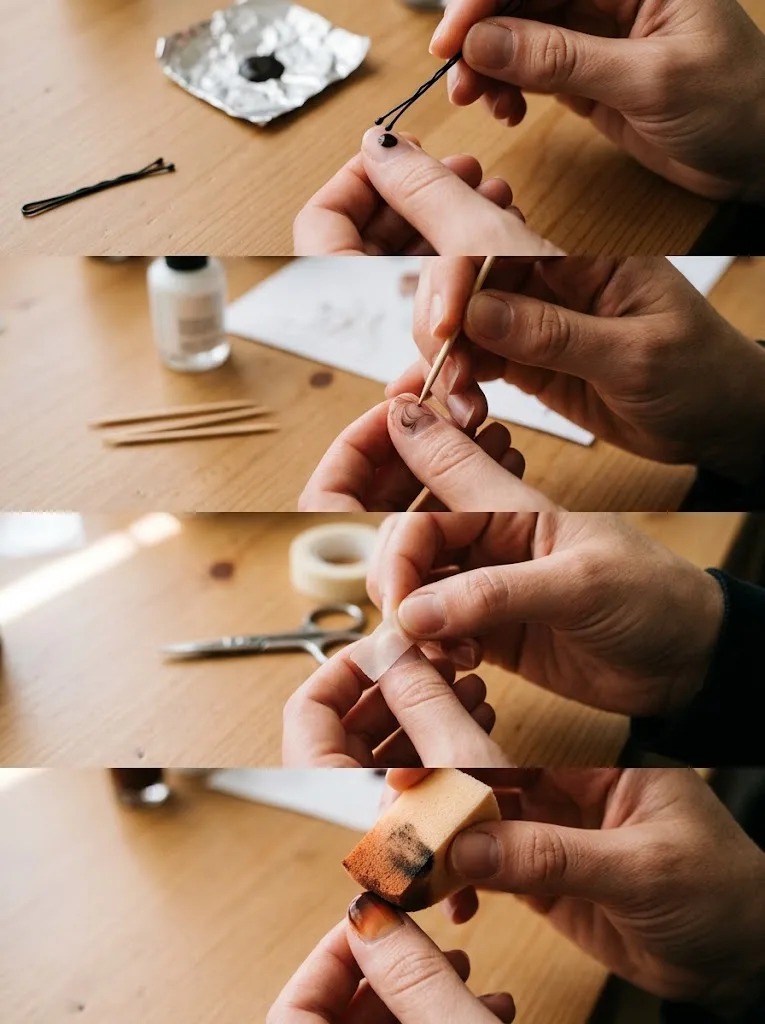
- Bobby Pins: The rounded plastic-coated tip of an unbent bobby pin creates medium-sized dots and simple flower petals.
- Wooden Toothpicks: Perfect for micro-dots, drawing tiny stems, dragging wet polish into marble patterns, or nudging decals into place.
- Washi Tape or Scotch Tape: Fantastic for masking off crisp geometric blocks and negative-space triangles.
- Makeup Sponges: High-density triangular cosmetic wedges are the gold standard for creating seamless ombré gradients and sunset blends.
What Beginners Should Skip for Now
Save your money and skip complex electric files (e-files), professional acrylic liquid and powders, intricate stamping plates with silicone scrapers, and bulky airbrushes. These tools have steep learning curves, require specialized ventilation, and can cause permanent damage to your natural nail plates if handled without professional training. Stick to simple, high-impact hand techniques while building your foundational skills.
[Related article: 10 Easy Nail Art Tutorial Step by Step for Absolute Beginners – Start Your Journey Today]
Choosing Your Medium: Regular Lacquer vs. Beginner Gel Polish
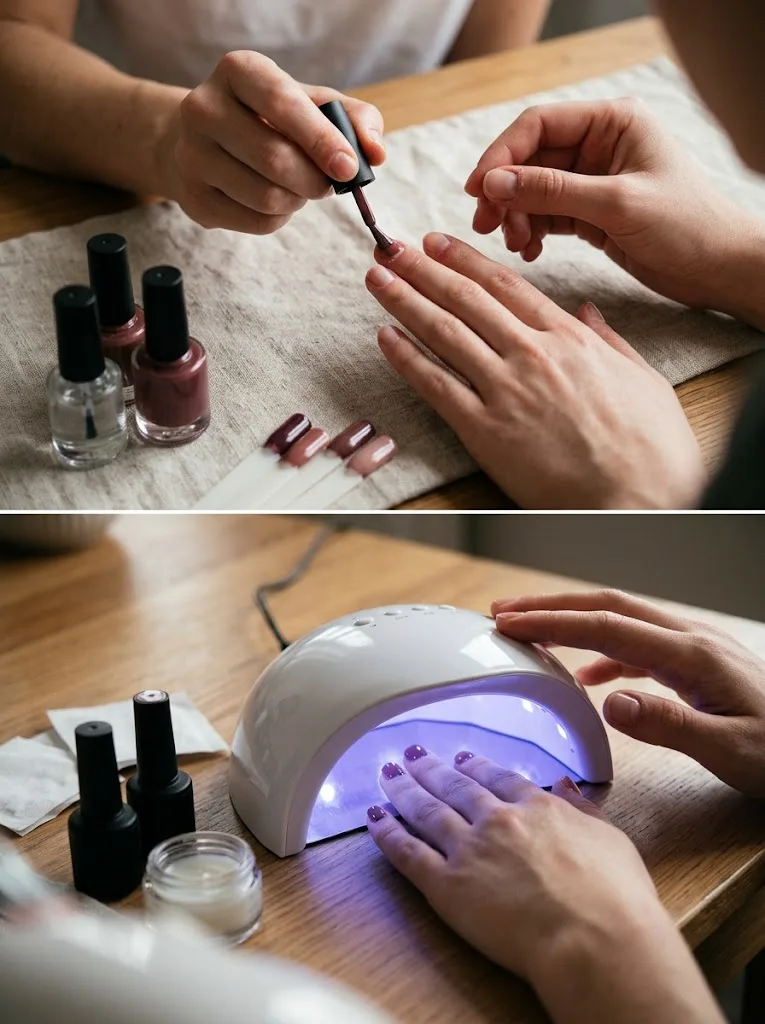
Before applying your design, you must decide whether to work with traditional air-dry lacquer or light-cured gel polish. Both have clear advantages and distinct learning curves for beginners.
Traditional Nail Polish
- Pros: Requires no UV/LED lamp, removes easily without prolonged soaking, is gentle on the natural nail plate, and is budget-friendly.
- Cons: Dries in the air while you work. If you take too long to paint a line or place a dot, the polish begins to string and gum up on your brush. Smudges during the drying phase are common.
Gel Polish (UV/LED Cured)
- Pros: The biggest benefit of gel for nail art beginners is that it will not dry until exposed to a curing lamp. You can take twenty minutes to perfect a single line, and if your hand shakes or you dislike the placement, you can wipe it away with a dry lint-free pad and start over without disturbing your base coat.
- Cons: Requires a quality LED lamp, takes longer to soak off, and carries safety considerations. Uncured gel must never sit on living skin, as repeated skin contact with uncured methacrylate monomers can trigger permanent contact allergies.
For absolute beginners, practicing your designs with regular polish on swatch sticks or practicing simple dot patterns with regular lacquer on your hands is a great way to start. If you choose gel, apply products with precision, keep them strictly on the nail plate, and wipe away any skin contact immediately before curing.
Prepping Your Nails for Long-Lasting Art
No matter how beautiful your design is, it will not last if the canvas underneath is improperly prepped. Proper prep creates mechanical and chemical adhesion so your manicure stays intact for days rather than peeling off in sheets.
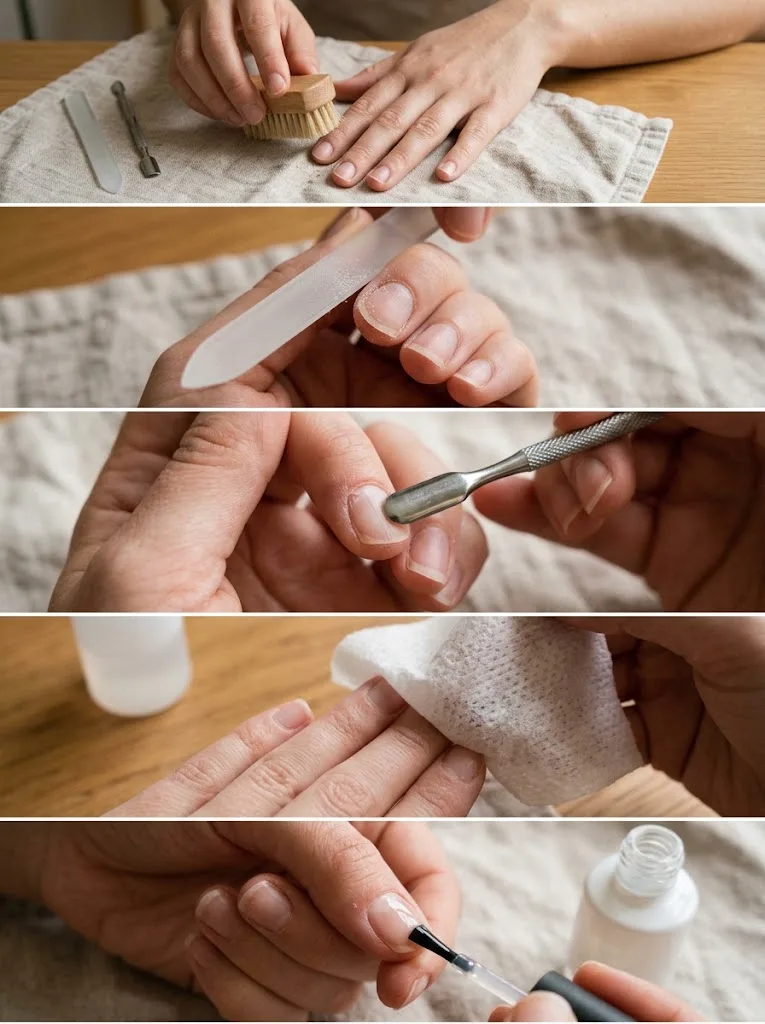
Step 1: Embrace the Waterless Manicure
The most common mistake beginners make is soaking their hands in a warm bowl of water before painting.
The human nail plate is porous, absorbing water like a sponge. When soaked, the nail swells and flattens out. If you paint polish over a waterlogged nail, the polish adheres to that expanded shape. Several hours later, as the water evaporates, the nail plate contracts back to its natural, curved C-curve. The rigid polish cannot shrink with the nail, causing the polish to crack, buckle, and lift within a day. Always perform your shaping, cuticle care, and cleaning completely dry.
Step 2: Shape on Dry Nails with a High-Grit File
Shape your free edges using a 240-grit wooden file or an etched-glass file. Etched-glass files are ideal for beginners because they grind down the keratin layers into a smooth, sealed powder rather than shredding the edge into jagged frays.
- File in one smooth direction from the outer edge toward the center.
- Avoid aggressive sawing back and forth, which causes the layers of the nail tip to separate (delaminate).
- For beginners, a soft squoval or gentle rounded shape is easiest to maintain and provides strong structural support against chipping.
Step 3: Gently Clear the True Cuticle
Polish will never bond to skin. Many beginners confuse the living skin at the base of the nail (the eponychium) with the true cuticle (the thin, whitish layer of dead skin clinging to the surface of the nail plate).
- Apply a liquid cuticle remover for sixty seconds.
- Using a rounded metal cuticle pusher or an orangewood stick, gently scrape the gummy, dead cuticle residue off the face of the nail plate.
- Never cut or trim the living eponychium fold. Only nip loose, transparent hangnails that are already detached.
- Wipe clean with a dry lint-free cloth.
Step 4: Dehydrate and Cleanse the Surface
Moisture, lotions, and natural body sebum act as barriers between the nail and your base coat. Saturate a lint-free wipe with 90% isopropyl alcohol or pure acetone and scrub each nail plate thoroughly, paying special attention to the lateral sidewalls and cuticle margins. Once cleansed, avoid touching your hair, face, or phone before applying base coat.
Step 5: Apply a Purpose-Driven Base Coat
Never paint colored polish or nail art directly onto bare nails. Base coat serves as the double-sided adhesive tape of your manicure and prevents dark pigments from staining your natural keratin.
- For uneven, grooved nails: Choose a ridge-filling base coat containing micro-minerals to create a smooth, porcelain-flat surface.
- For flexible, peeling nails: Choose a rubberized or bonding base coat that flexes with daily impacts.
Related article: Hottest Stiletto Nail Art for the Most Dramatic Manicure of Your Life – 9 Showstopping Looks
Mastering the Three-Stroke Rule and Polish Control
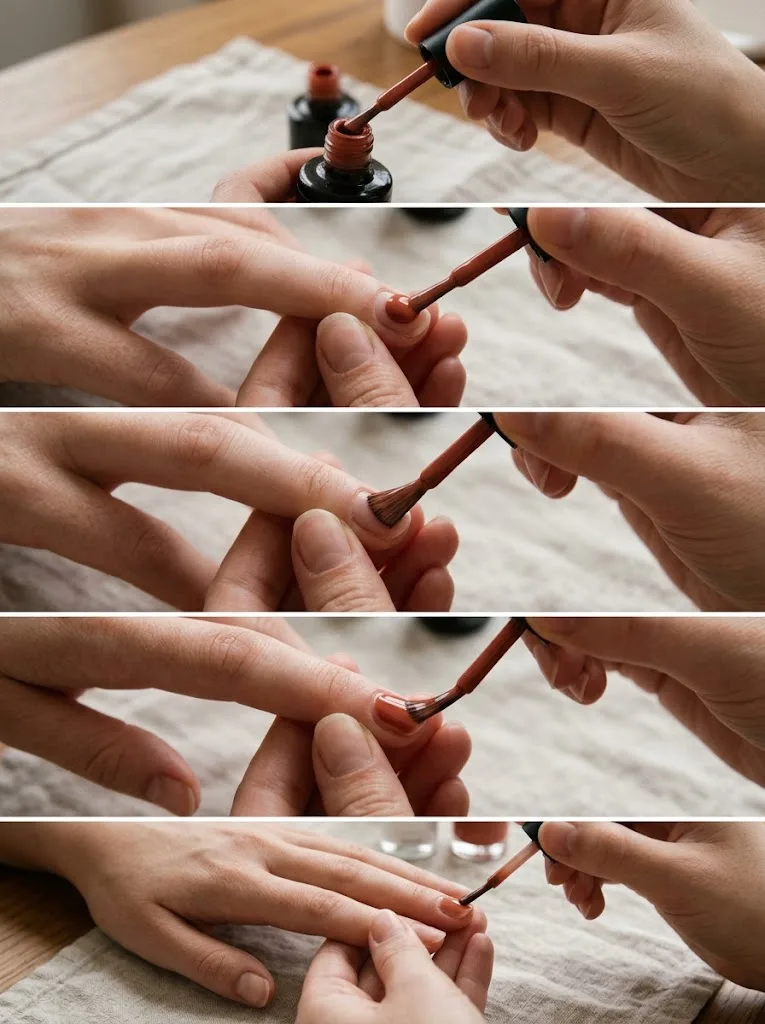
Before drawing designs, your base color must be smooth, opaque, and bubble-free. Uneven, clumpy base polish will distort any nail art applied on top of it.
- Wipe the Brush Neck: Remove the polish brush from the bottle. Wipe one side of the stem completely clean against the bottle’s inner neck, leaving a controlled, rounded bead of polish on the opposite side.
- Anchor the Bead: Place the brush bead in the center of the nail, approximately two to three millimeters away from the cuticle line.
- Nudge and Pull: Gently nudge the brush backward toward the cuticle, stopping just short of the skin to create a clean, microscopic margin. Then, press down lightly so the bristles fan out, pulling the brush forward down the center of the nail to the tip.
- Sweep the Sides: Lift the brush, return to the base, and pull a smooth stroke down the left flank, followed by one down the right flank.
- Keep It Thin: Always apply two or three paper-thin coats rather than one heavy, thick layer. Thin coats dry faster, resist bubbling, and do not pool into your side cuticles.
5 Foolproof Nail Art Techniques for Complete Beginners
These five techniques require minimal hand dexterity, use accessible tools, and yield polished results on natural nails of any length.
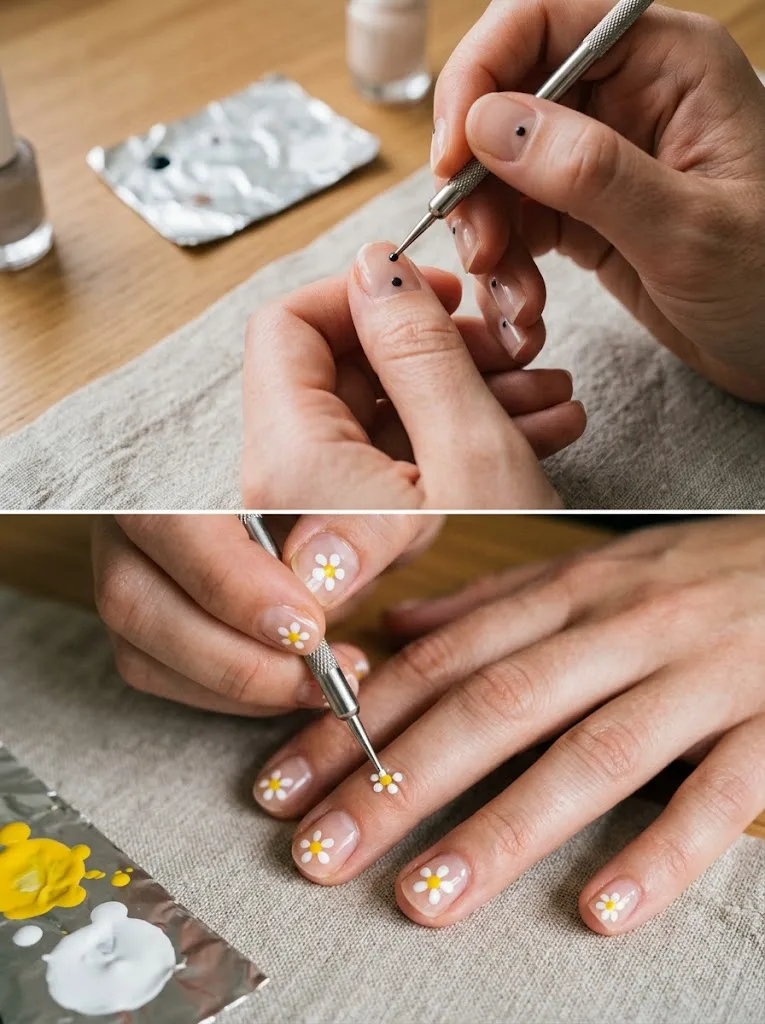
1. The Dotting Method (Micro Dots, Daisies, and Floating Accents)
Dotting is the easiest gateway into nail art. Because the metal ball of a dotting tool controls the shape, you do not need to worry about uneven brush strokes.
- Floating Pinpoint Dots:
- Apply your base color and let it dry.
- Dispense a drop of contrasting polish onto your palette.
- Dip the smallest end of your dotting tool straight into the polish. Ensure only the ball is coated—not the metal shaft.
- Hold the tool perpendicular (at a 90-degree angle) to the nail plate and touch it down gently. Do not press hard; let the liquid transfer itself. Lift straight up.
- Place a single dot near the cuticle line on each finger for an editorial, modern minimalist look.
- Five-Petal Daisies:
- Place one central yellow dot on the nail.
- Using a slightly larger dotting tool dipped in white polish, place five surrounding dots encircling the center, leaving a tiny gap between them.
- As the dots settle, they naturally form a delicate floral silhouette.
2. The Striping Tape Method (Geometric Color Blocking)
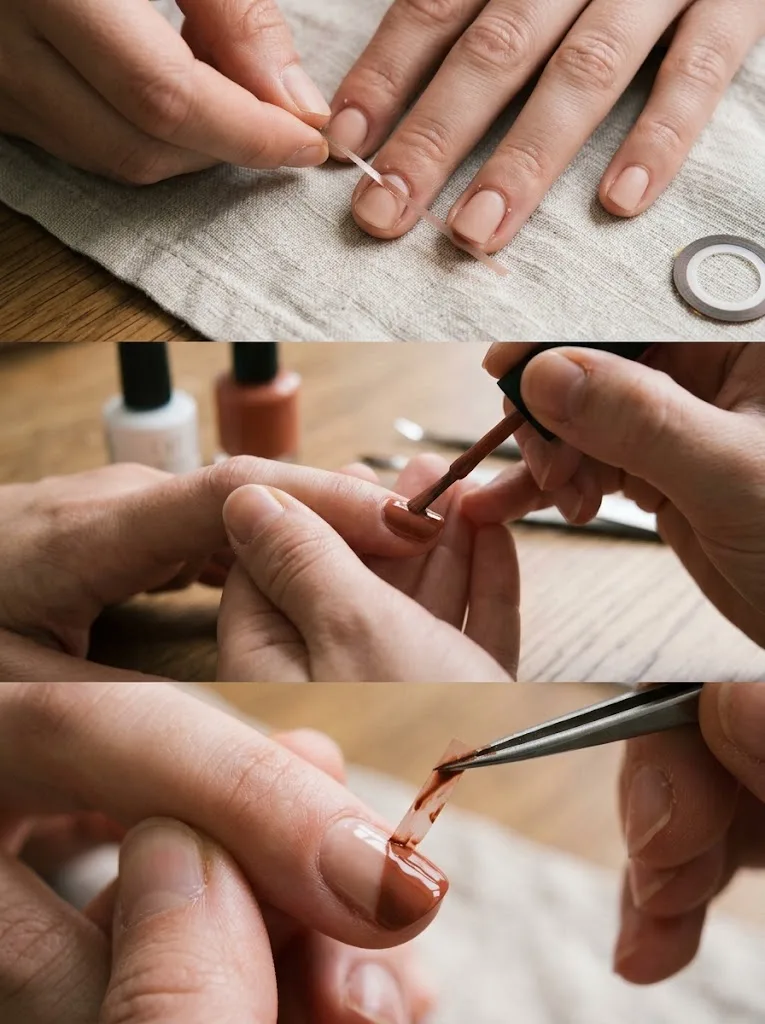
If you struggle to paint straight lines freehand, let tape do the heavy lifting for you.
- How to Execute Clean Lines:
- Paint your base color and allow it to dry one hundred percent. If the base is even slightly tacky, the tape will rip the color off when lifted.
- Cut small strips of low-tack nail striping tape or standard household scotch tape (blot scotch tape on the back of your clean hand first to reduce stickiness).
- Press the tape firmly across the nail diagonally, ensuring there are no air bubbles along the edges.
- Paint your contrasting accent color directly over the exposed section of the nail, covering the edge of the tape.
- Remove the tape immediately while the paint is still wet. If you wait for the polish to dry, it forms a cohesive film with the tape, resulting in jagged, torn edges. Pull the tape away in one smooth, confident motion.
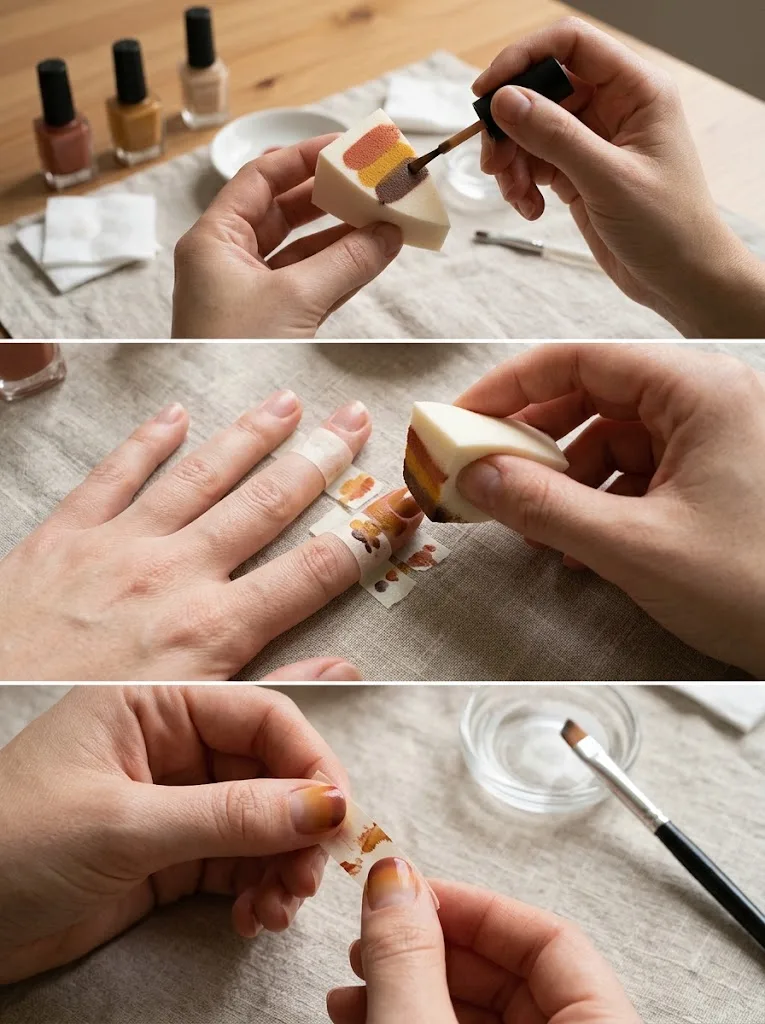
3. The Cosmetic Sponge Gradient (Soft Ombré)
Gradual color blends look effortlessly complex, but a simple makeup wedge makes them easy to recreate at home.
- Step-by-Step Ombré:
- Paint your nails with a white or pale cream base coat to make your gradient colors pop.
- Protect the skin around your nail by applying liquid latex barrier or pressing small strips of tape along your sidewalls and cuticle.
- Take a clean, high-density makeup sponge. Paint two or three horizontal stripes of your chosen colors directly onto the flat edge of the sponge, slightly overlapping them where they meet.
- Gently bounce the sponge up and down against the nail plate. Dab in slightly varying positions (a millimeter up and down) to diffuse the harsh line between colors.
- Allow the first pass to dry for two minutes, reapply fresh polish to the sponge, and repeat the dabbing motion for a second coat to build rich opacity.
- Peel away the protective barrier and clean up any stray pigment around the edges with your acetone-soaked brush.
4. The Long Striper Drag (Minimalist Pinstripes and Waves)
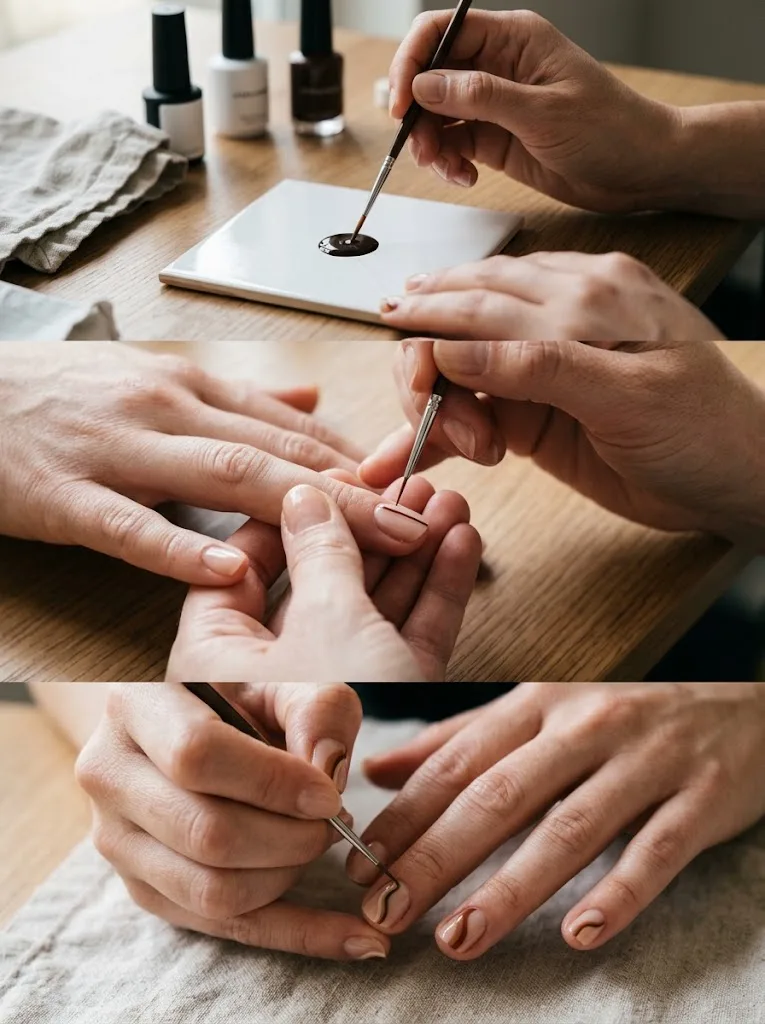
When you are ready to try freehand line work, using the correct brush makes all the difference. Short detail brushes wobble easily, but a long striper brush (9mm to 11mm) acts like a ruler.
- How to Paint Straight Lines:
- Coat the bristles evenly in polish by rolling the brush in a small puddle on your palette. The bristles should look sleek and saturated, without a heavy bead hanging from the tip.
- Anchor your pinky finger against your work surface or the table edge to stop any hand tremors.
- Touch the tip of the brush down at the starting point. Instead of “painting” with small, jerky strokes, keep the brush steady and pull your entire hand smoothly downward. The length of the bristles naturally trails in a straight line.
- For organic abstract waves, gently twist the handle of the brush between your index finger and thumb as you glide it across the nail plate to vary the line’s thickness naturally.
5. The Micro French Tip (The Silicone Stamper Hack)
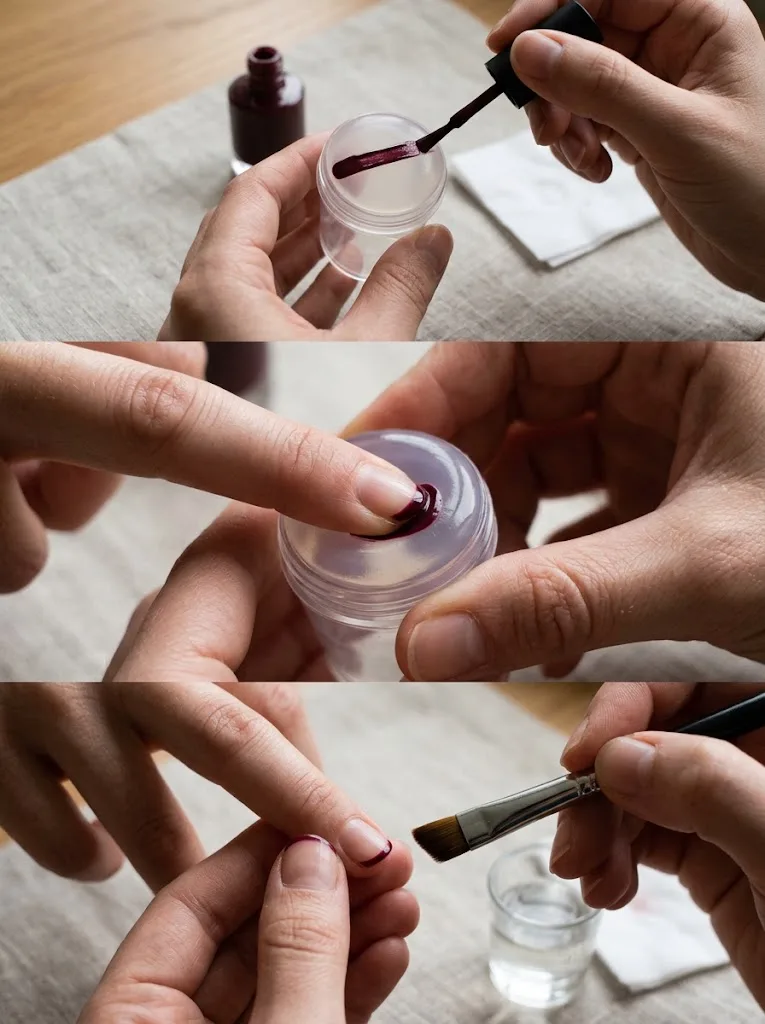
Painting traditional French smile lines can challenge even experienced nail artists. This clever silicone stamper trick guarantees razor-thin, uniform tips every time.
- The Stamper Method:
- Apply your neutral base color and let it dry completely.
- Paint a thin, horizontal puddle of your tip color (white, black, or a bold jewel tone) across the soft silicone head of a nail stamper.
- Hold your finger at a 45-degree angle to the stamper.
- Press the tip of your nail gently into the silicone pad until the polish wraps cleanly around the free edge.
- Slowly roll your finger from left to right while pressing downward to deposit a crisp, even micro-ribbon along the edge.
- Lift straight out, and use your cleanup brush to wipe away any excess that transferred to the skin beneath your fingertip.
Related article: The Complete Guide to Nail Stamping Art Ideas for Perfect Patterns Every Time – 10 Stunning Looks to Try
Conquering the Non-Dominant Hand Dilemma
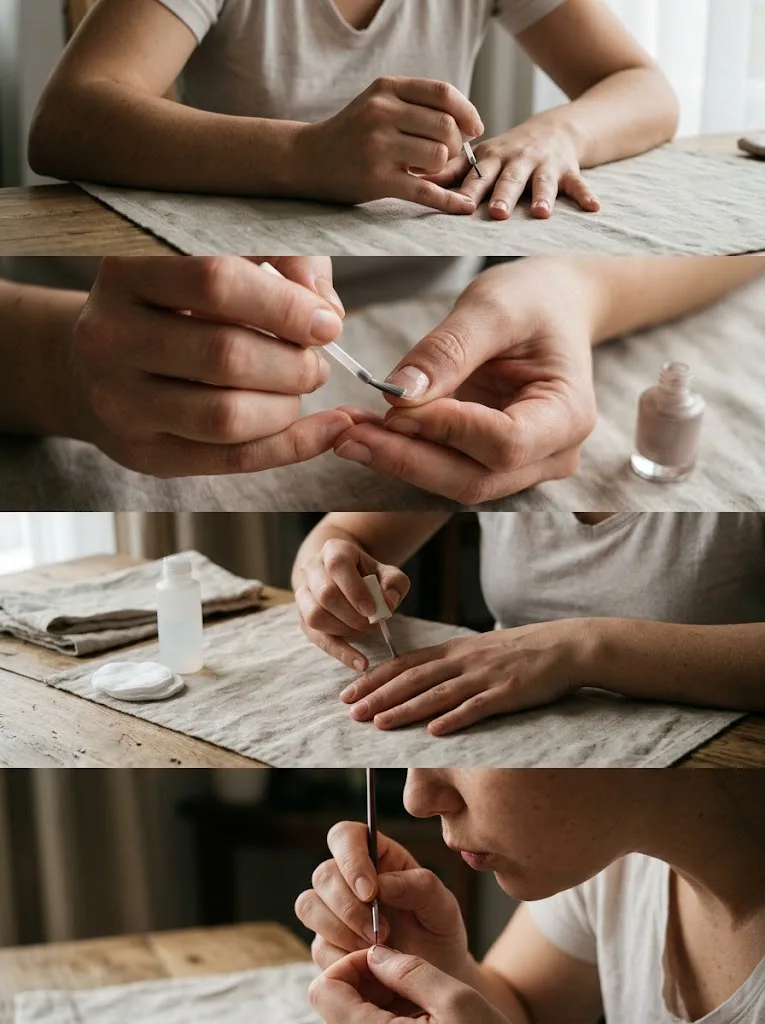
Almost every beginner encounters the same hurdle: their dominant hand looks like a salon masterpiece, while their non-dominant hand looks like an abstract mess. Overcoming this comes down to ergonomics and body positioning rather than innate ambidexterity.
- Anchor Everything: Never paint with your elbows hovering in the air. Rest both forearms flat against a sturdy table. Anchor the pinky finger of your painting hand against the table surface or against the knuckle of the finger being painted to create a stable tripod.
- Move the Canvas, Not the Brush: When painting with your awkward hand, keep your brush relatively still. Instead of trying to maneuver the brush around the curved curves of your nail, rotate the finger being painted beneath the steady brush. Rolling the canvas gives you far more precision than flicking an unsteady wrist.
- Paint Your Non-Dominant Hand First: Always tackle your difficult hand at the start of your session when your patience, focus, and energy are at their peak. Leaving your difficult hand for the end often leads to rushing and careless mistakes.
- Breathe Out on Detail Strokes: Take a relaxed breath and draw your lines while gently exhaling. Holding your breath causes subtle muscle tension, which translates directly into shaky brush strokes.
Sealing the Deal: How to Top Coat Without Ruining Your Art
Few things are more heartbreaking than spending forty-five minutes painting a crisp, detailed design only to watch a heavy top coat smear the wet pigment into a blurry streak across your nail plate.
The Art of “Floating” the Brush
To protect your hand-painted lines:
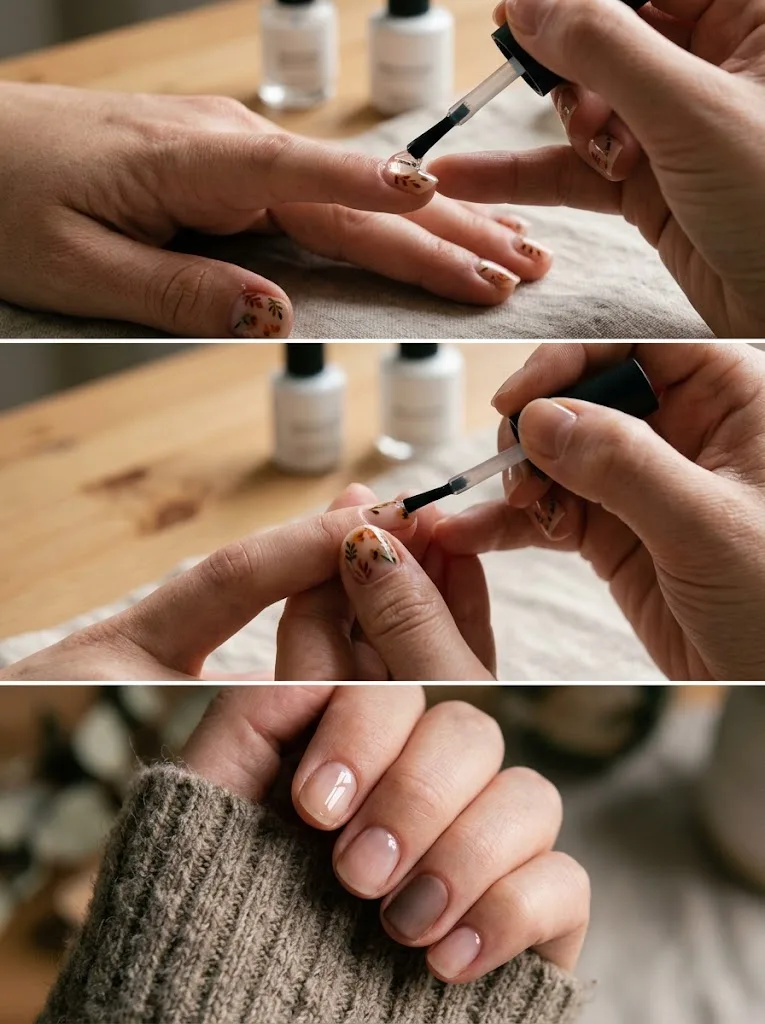
- Allow your nail art to dry thoroughly. Wait at least five to ten minutes for regular lacquer to set.
- Load a generous, plump bead of clear top coat onto the brush.
- Bring the brush down close to the nail plate so that only the bead of liquid touches the artwork—the bristles should never physically touch your painted lines.
- Gently glide the brush forward, letting the bead of top coat roll down the nail ahead of the bristles. This technique is known as “floating,” and it ensures your clear coat glazes over the design without dragging the colors beneath.
Capping the Free Edge
Before finishing your top coat stroke, lightly swipe the horizontal edge of your brush across the very tip of the nail plate. This wraps the clear lacquer over the exposed edge of the nail, sealing the layers together and creating a defensive bumper against keyboard typing, friction, and early chipping.
Choosing Your Top Coat Finish
- Quick-Dry High Gloss: Dries lacquer down to the base in minutes, providing a mirror-like shine and everyday durability.
- Plumping Gel-Effect Lacquer: Mimics the thick, cushiony optical depth of a salon gel manicure without needing UV light curing.
- Velvet Matte: Transforms glossy designs into soft, modern, tactile textures. Matte finishes look exceptionally striking over dark geometric patterns, plaid, and earth tones.
Troubleshooting Common Beginner Nail Art Mistakes
When things do not go as planned, use these quick diagnostic fixes:
1. The Polish Is Bubbling and Pitting
- The Cause: Shaking your polish bottles up and down vigorously incorporates pockets of air into the formula. Applying thick coats or sitting directly under a ceiling fan or draft can also cause the top surface of the polish to skin over before solvents underneath have a chance to evaporate, trapping escaping gases as tiny bubbles.
- The Fix: Never shake polish bottles. Roll them back and forth between the palms of your hands to warm and mix pigments evenly. Work in thin layers and keep your painting station away from direct airflow.
2. Fine Detail Lines Keep Bleeding or Spreading
- The Cause: Your detail brush has too much product loaded onto the stem, or your base color was still tacky when you began painting details over it.
- The Fix: Wipe your detail brush clean on a lint-free wipe dampened with alcohol or acetone before reloading. Pick up only a micro-drop of pigment at the very tip of the hairs. Ensure your base polish is dry to the touch before painting line work.
3. The Cuticle Line Looks Ragged and Uneven
- The Cause: Attempting to paint too close to the skin on your initial stroke, causing polish to pool into the proximal nail fold.
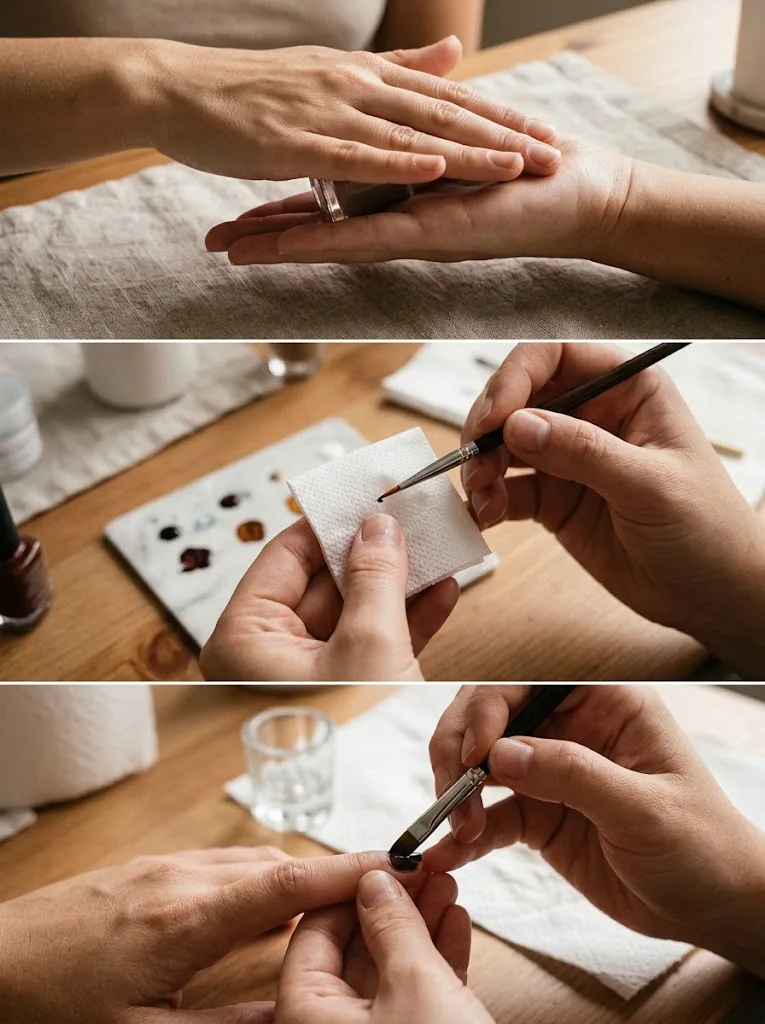
- The Fix: Always leave a microscopic one-millimeter gap between your polish and your skin. If polish touches the cuticle, do not wait for it to dry. Immediately dip your angled cleanup brush into pure acetone, blot the excess liquid onto a paper towel, and glide the brush along the cuticle fold to carve out a clean, crisp crescent.
How to Make Your At-Home Nail Art Last 7+ Days
A beautiful DIY manicure deserves to last. Protecting your artwork involves simple, protective daily habits:
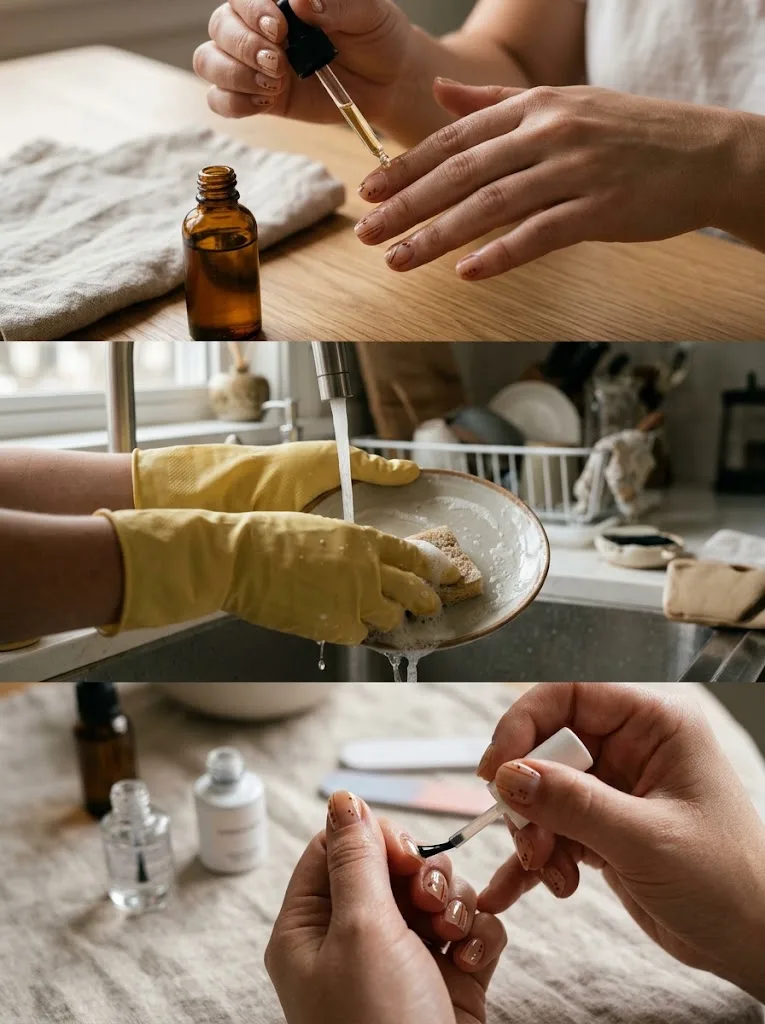
- Incorporate Jojoba Oil Daily: Hydrated nails are flexible nails. When an un-oiled natural nail gets bumped, the dry plate bends stiffly, causing the rigid polish on top to snap and chip. Massaging pure jojoba oil into your cuticles and under the free edge twice daily maintains healthy nail elasticity and keeps polish flexible.
- Wear Rubber Gloves for Wet Chores: Water is the primary enemy of natural nail polish. Long showers, dishwashing, and household cleaning chemicals soften the nail plate, causing the polish to lose its bond. Keep lined dishwashing gloves by your kitchen sink and wear them diligently.
- Refresh Your Top Coat on Day Three: Micro-scratches and daily friction naturally wear down the shine and edge seal of your manicure over time. Applying an ultra-thin layer of fresh top coat mid-week restores glossy reflection and reseals the free edge for several additional days of wear.
Frequently Asked Questions
What is the easiest nail art design for an absolute beginner to try first?
The single micro-dot manicure placed just above the cuticle line is by far the simplest. It requires zero freehand drawing, can be done with an everyday bobby pin or dotting tool, takes less than five minutes, and produces a clean, high-fashion aesthetic that flatters nails of any length.
Can I use acrylic craft paint for DIY nail art?
Yes. Many professional nail artists use water-based acrylic craft paint for intricate detail work over regular lacquer or gel base coats. Acrylic paint dries quickly, flows smoothly off a detail brush, and can be completely wiped away with a damp cloth if you make a mistake without disturbing the polish underneath. You must, however, seal acrylic paint with a generous layer of clear top coat, as it will wash away with water if left unprotected.
Why do my nail art brushes get stiff and ruined after a few uses?
Brushes stiffen when polish dries deep inside the ferrule (the metal band holding the hairs). To preserve your brushes, never let wet polish sit on the bristles after a session. Swirl the brush gently in acetone or brush cleaner, wipe it clean on a lint-free pad, and reshape the damp hairs with your fingers before storing the brush horizontally or standing upright in a cup. Never soak brushes bristle-down in a jar, as this permanently bends the delicate tips.
How do I prevent my striping tape from peeling off my base color?
Ensure your base color is entirely dry before applying tape. If using regular polish, wait at least twenty to thirty minutes, or use a quick-dry top coat over the base before taping. Additionally, tap the sticky side of the tape against the back of your hand once or twice before placing it on your nail to soften its adhesive grip so it lifts away cleanly without pulling up color.
Can I do nail art on very short or bitten nails?
Absolutely. Short nails look exceptionally chic with minimalist nail art. Focus on designs that celebrate open space, such as micro French tips, negative-space half-moons, vertical pinstripes down the center of the nail, or floating pinpoint dots. Avoid heavy, busy designs that cover the entire nail, which can make small nail beds appear crowded.
How long should I wait between layers of polish when doing nail art?
When using traditional lacquer, wait roughly two to three minutes between thin coats of base color until the surface is tacky but set. Before painting detailed art or applying striping tape over your base, wait ten to fifteen minutes to ensure the foundation does not shift under the brush. If using gel polish, follow your lamp’s standard curing times (typically thirty to sixty seconds) between each layer.
Learning how to do nail art at home is a skill built on patience, the right sequence of steps, and knowing how to correct small mistakes along the way. By starting with simple, high-impact techniques like dotting and tape color-blocking, you will quickly build the brush control, muscle memory, and confidence needed to turn your hands into your favorite creative canvas.
Ready to find your next look? Explore our step-by-step seasonal manicure galleries, browse our guides to finding the perfect polish shades for your skin tone, and discover practical routines to keep your natural nails strong and healthy year-round.
Pin This Guide for Later!
Learn how to do nail art at home with this complete beginner’s guide! Discover essential DIY tools, simple nail prep steps, 5 easy beginner techniques, and pro tricks for painting your non-dominant hand. Click through to start your DIY manicure journey!
#NailArtForBeginners #DIYManicure #NailArtTutorial #AtHomeNails #NailCareTips
