Transform Your Nails: How to Do 3D Flower Nails at Home Step by Step with this beginner-friendly guide. Learn the tools, techniques, and pro tips to create stunning floral nail art that pops!
Have you ever scrolled through Pinterest and stopped dead in your tracks at those gorgeous 3D flower nails? You know the ones – where the petals look so real they seem to bloom right off the fingertips. And then you thought, “That’s way too hard. I could never do that.” I totally get it. I used to think the same thing.
But here’s the secret: creating stunning dimensional floral nails isn’t as complicated as it looks. With the right guidance, a little patience, and this tutorial, you can absolutely master it. This complete guide will show you exactly how to do 3D flower nails at home step by step. We’ll break down every stage, from gathering your supplies to sculpting your first perfect petal. By the time you finish reading, you’ll feel confident and excited to try it yourself. Ready to turn your nails into miniature masterpieces? Let’s dive in!
Why You’ll Fall in Love with 3D Flower Nails
There’s something magical about 3D nail art. Unlike flat designs, these flowers have real texture and depth. They catch the light differently. They literally pop off your nails. It’s like wearing a tiny garden on your fingertips – and honestly, it’s such a confidence booster.
The best part? You don’t need to be a professional nail technician to create them. With practice, anyone can learn. Whether you’re prepping for a wedding, a girls’ night out, or just want to treat yourself to something special, 3D flower nails are the ultimate statement manicure. And once you know how to do 3D flower nails at home step by step, you can create custom designs for every occasion.
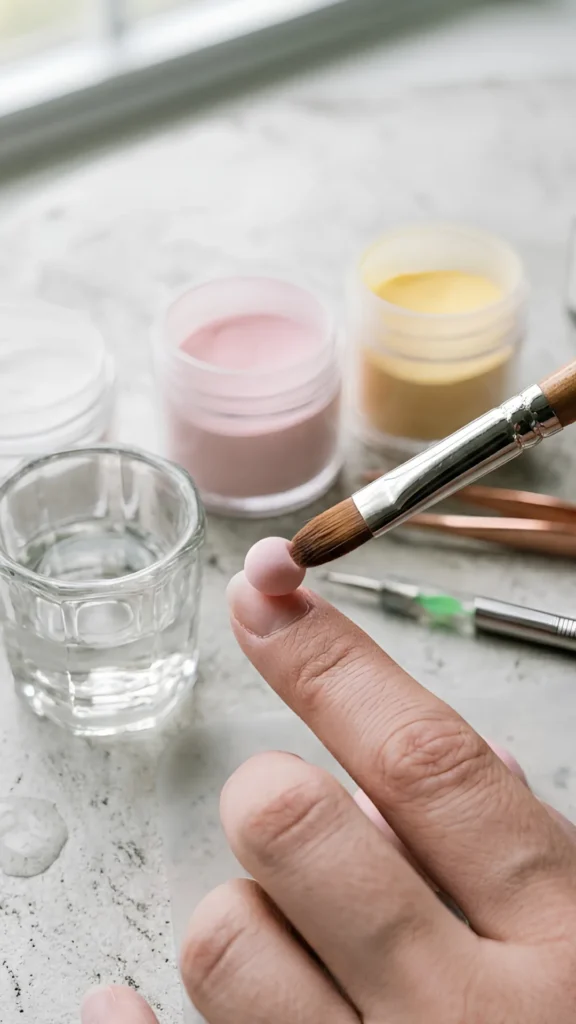
Your Essential Toolkit for 3D Flower Nail Art
Before we start sculpting, let’s gather your supplies. Having the right tools makes all the difference. Think of this as your artist’s paintbrush set.
Here’s what you’ll need:
- Acrylic powder and liquid monomer – This is what creates the 3D structure. You’ll want clear or pink-toned powder for sculpting, plus colored powders for your petals.
- A quality acrylic brush – Look for a size #6, #7, or #8 oval brush with a slightly rounded tip. This is your most important tool.
- A dappen dish – A small glass dish to hold your monomer liquid.
- Nail tips or forms – These create the base for your acrylic nails if you’re doing a full set.
- Base and top coat – A non-wipe top coat is ideal so your 3D art stays shiny.
- Dotting tools and tweezers – Great for placing small beads and adding details.
- Nail file and buffer – For shaping and smoothing.

Pro tip: You don’t need to buy everything at once. Start with the basics and build your collection as you go. The key is to have good quality acrylic powder and a reliable brush – those will make your learning curve so much smoother.
Prep Like a Pro: The Foundation for Fabulous Flowers
Before you even think about picking up that acrylic bead, proper nail preparation is absolutely crucial. This step is like priming a canvas before you paint – skip it, and your masterpiece won’t last.
Follow these prep steps:
- Sanitize – Wash your hands thoroughly and sanitize your workspace.
- Push back cuticles – Gently push back your cuticles with a cuticle pusher to expose the nail plate.
- Buff the nail surface – Lightly buff your natural nails with a fine-grit file (around 240 grit). This removes shine and helps the acrylic grip better.
- Apply primer – This helps the acrylic adhere to your natural nail.
- Apply your base color – Paint your nails with your chosen background shade and let it dry completely.
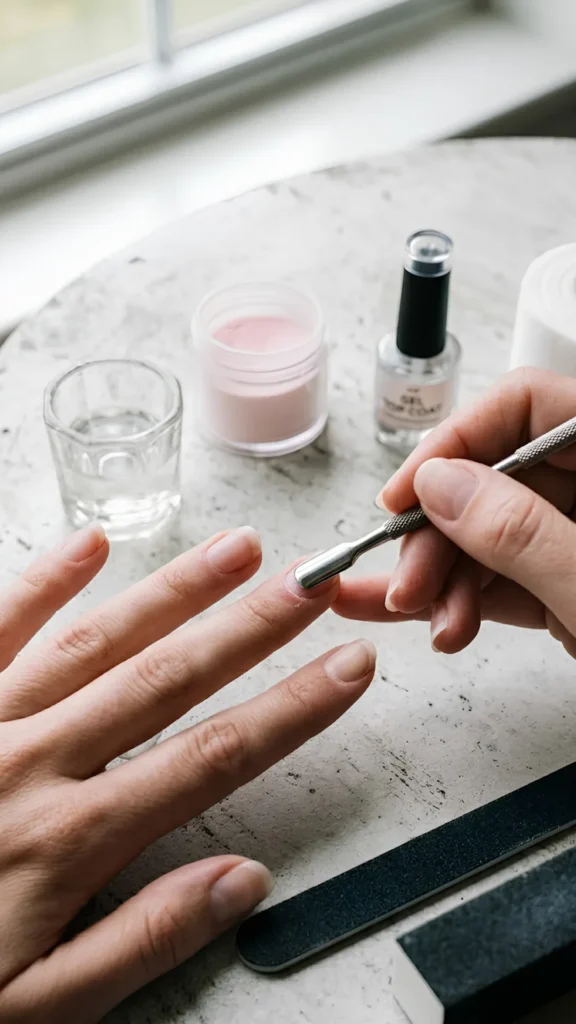
Remember: A good foundation means your 3D flowers will stay put for weeks. Take your time with this step – it’s worth it!
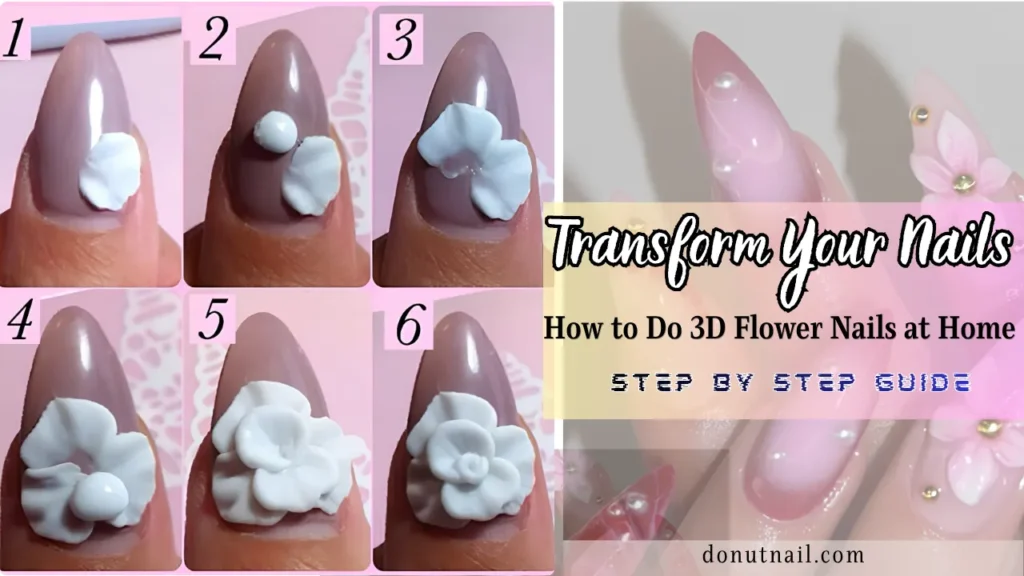
How to Do 3D Flower Nails at Home Step by Step: The Sculpting Process
Okay, this is what you’ve been waiting for. Let’s get into the actual sculpting. I’m going to walk you through creating a simple yet stunning 3D flower. This is the core of learning how to do 3D flower nails at home step by step.
Step 1: Master the Perfect Acrylic Bead
The secret to beautiful 3D flowers is getting your acrylic bead consistency just right. Dip your brush into the monomer, wipe off the excess, then lightly touch it to your acrylic powder. You want to pick up a small, slightly moist ball of acrylic.
Here’s a quick guide to bead consistency:
- Too wet – The bead will be soupy and spread out. It won’t hold its shape.
- Too dry – The bead will be crumbly and hard to shape.
- Just right – A smooth, slightly firm ball that holds its shape but remains moldable.
Let the bead sit for a few seconds until it becomes slightly matte. That’s your sweet spot for sculpting.
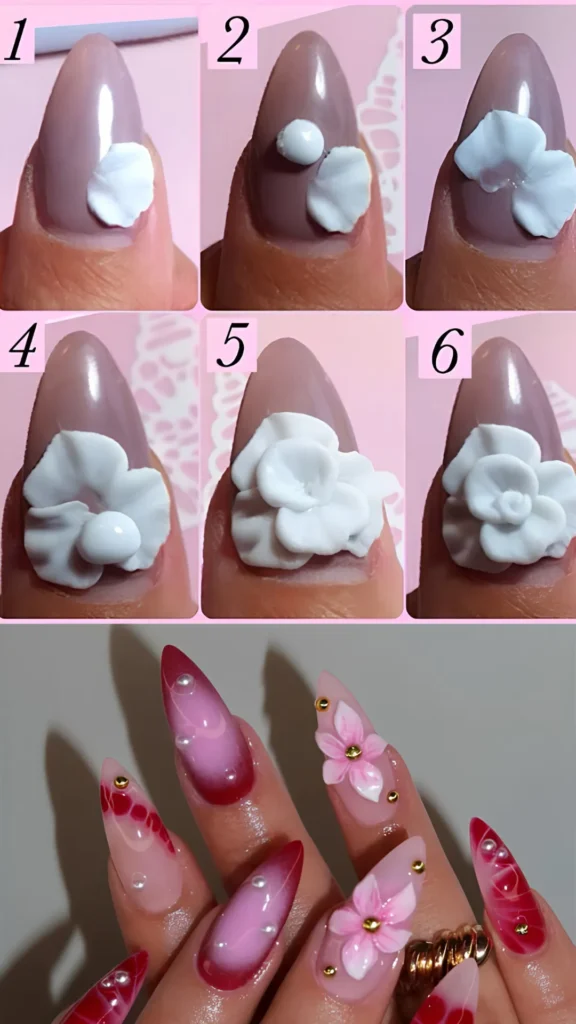
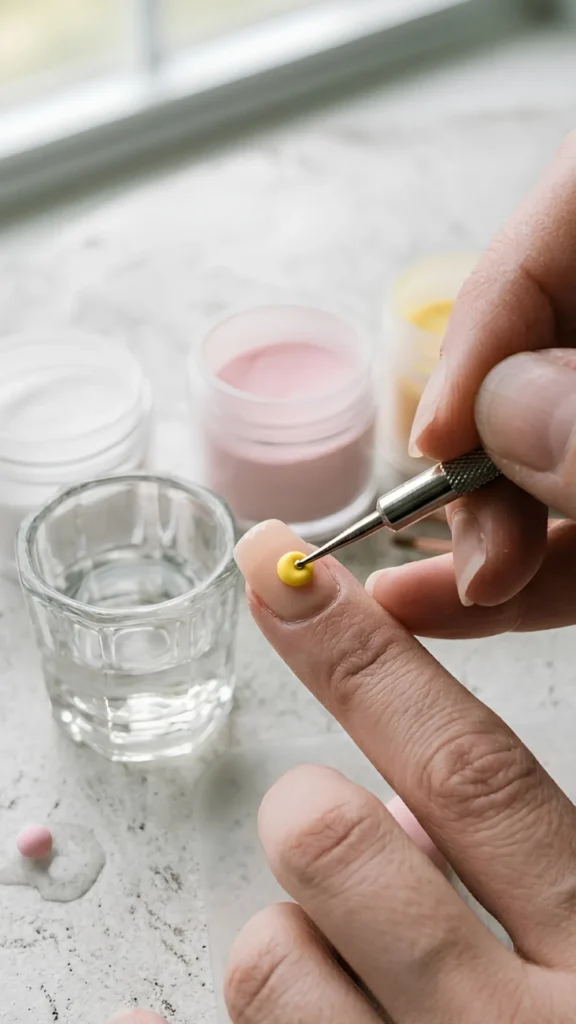
Step 2: Create the Flower Center
Place a small bead of your chosen color (yellow works great for a classic flower center) where you want the middle of your flower to be. Use your brush or a dotting tool to gently press it into a rounded shape. This will be the anchor for your petals.
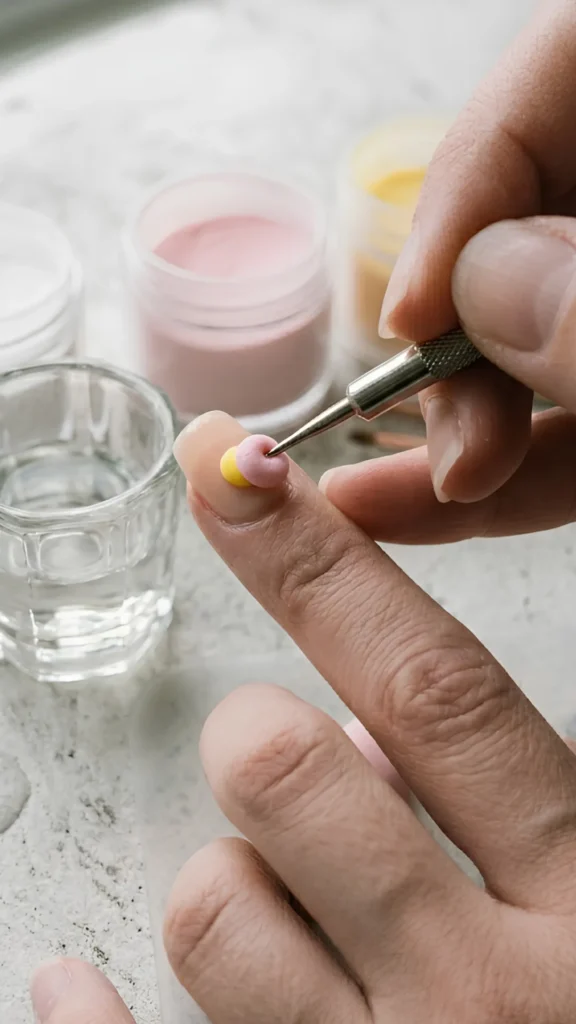
Step 3: Sculpt the First Petal
Now for the fun part! Pick up a slightly larger bead of your petal color – pink, white, red, or whatever you love.
Place the bead next to your flower center. Then, using your brush, gently press down on the bead and pull it outward to create a petal shape. You’re essentially flattening and stretching the acrylic into a teardrop or oval form.
Work quickly but carefully – acrylic dries fast, which helps petals keep their shape but requires a steady hand.
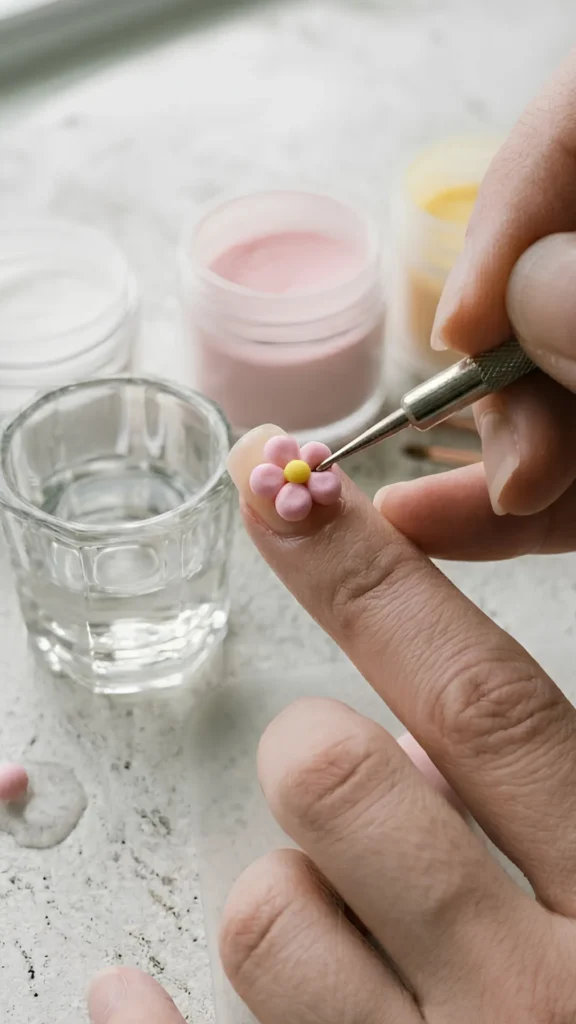
Step 4: Add More Petals
Repeat Step 3 to create additional petals around your flower center. For a classic five-petal flower, you’ll need five beads arranged in a circle.
As you place each petal, push them slightly toward the center so they connect beautifully. Think of it like assembling a puzzle – each piece should fit snugly against the others.
Step 5: Layer for Dimension
Want your flower to look truly professional? Add a second layer of petals slightly offset from the first. This creates depth and makes your flower look fuller and more realistic.
You can also experiment with different colors for each layer – maybe a lighter pink for the outer petals and a deeper shade for the inner ones.

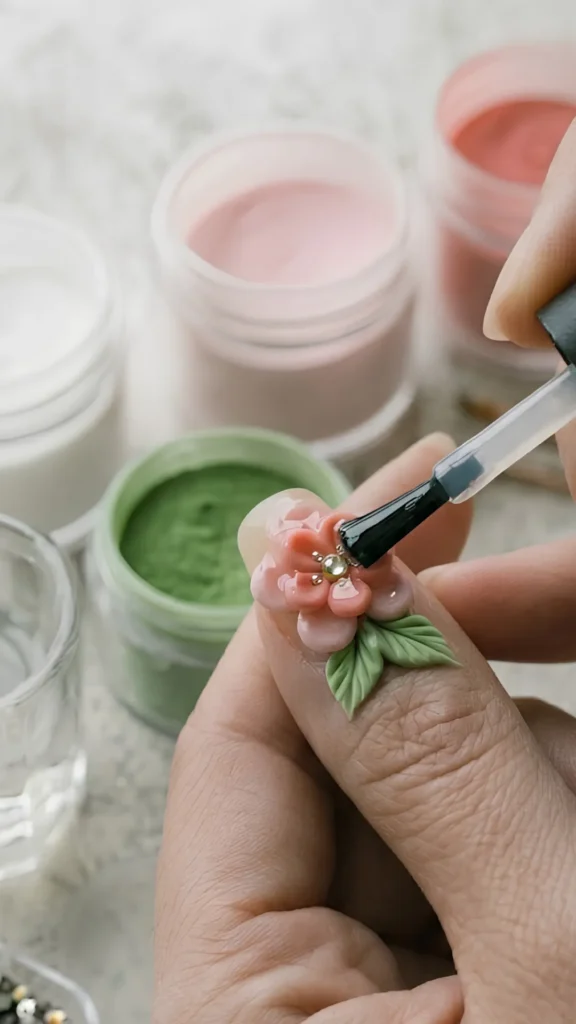
Step 6: Add Leaves and Accents
Once your flower is sculpted, consider adding a few leaves. Use green acrylic powder and the same technique – place a bead and stretch it into a leaf shape.
For extra sparkle, you can add tiny rhinestones or beads to the flower center. This gives your design a glamorous, eye-catching finish.

Step 7: Cure and Seal
If you’re using gel products, cure your design under a UV/LED lamp. If you’re using traditional acrylic, let it air dry completely.
Finally, apply a generous coat of top coat to protect your 3D flowers and add a gorgeous shine. A non-wipe top coat works best because it won’t dull your 3D art.
Pro Tips for Stunning 3D Flower Nails
You now know the basics of how to do 3D flower nails at home step by step. But let me share a few insider tips that will take your floral nail art to the next level.
Work with a light touch – Acrylic is forgiving. If a petal doesn’t look perfect, you can gently reshape it with your brush before it fully hardens.
Practice on a nail tip first – Before you commit to your actual nails, practice sculpting flowers on a spare nail tip. This builds confidence and helps you perfect your technique.
Clean your brush regularly – Acrylic can dry on your brush and ruin it. Keep a small dish of brush cleaner or alcohol nearby and clean your brush between each bead.
Don’t rush – Rome wasn’t built in a day, and neither are perfect 3D flowers. Take your time, enjoy the process, and remember that every nail artist started exactly where you are now.
Experiment with colors – Don’t limit yourself to traditional flower colors. Try bold reds, dreamy pastels, or even neon shades for a modern twist.
Common Mistakes to Avoid
Even experienced nail artists make mistakes. Here are the most common pitfalls and how to avoid them:
Using too much monomer – This makes your bead too wet and impossible to shape. Always wipe your brush before picking up powder.
Skipping nail prep – I can’t stress this enough. Proper prep is the difference between flowers that last weeks and flowers that pop off in days.
Overworking the acrylic – Acrylic sets quickly. If you keep touching and reshaping it, you’ll end up with a messy, lumpy petal. Place it, shape it once or twice, and leave it alone.
Your 3D Flower Nail Journey Starts Now
Learning how to do 3D flower nails at home step by step is a journey, not a destination. Your first attempt might not look like a professional salon creation – and that’s completely okay! Every master was once a beginner. The important thing is to start, to practice, and to have fun with it.
Imagine the look on your friends’ faces when they see your stunning floral nails and ask, “Where did you get those done?” And you get to say, “I made them myself!” That feeling is priceless.
Ready to Bloom? Let’s Create Together!
I hope this guide has inspired you to grab your supplies and start creating. Remember, the most important ingredient is your creativity. Don’t be afraid to experiment, make mistakes, and try again. Your perfect 3D flower nails are waiting to be born.
If you found this tutorial helpful, save it to your Pinterest board so you can come back to it anytime. And if you create something beautiful, I’d absolutely love to hear about it! Drop a comment below and share your floral nail art journey with us. Happy sculpting, gorgeous!
Learn exactly how to do 3D flower nails at home step by step with this complete beginner-friendly guide! From tools and prep to sculpting perfect petals, I’ve got you covered. Save this pin to transform your nails into stunning floral art! #3DFlowerNails #NailArtTutorial #DIYNails
Table of Contents
You might also Like: 7 Ways to Get Rich Girl Nails Without the Price Tag – Subtle Nail Art for a Quiet Luxury Manicure

